DISCLAIMER:
The following steps were done on a Windows Vista Business x86. You can follow the next steps but on your own risk. Also keep in mind that different operating systems can behave differently.
As I started the class of Security on the Internet, an interesting situation occurred: I needed to setup a signature and encryption for my emails. Our lecturer, Dr. Michael Nüsken, advised us to install Thunderbird and GnuPG as a proven solutions, but allowed us to use any other that we saw suited for doing the homework exercises.
Since I'm new in cryptography I choose to follow the advice, and later to find out if there are any more simpler good ways to accomplish the target of this class: secure and reliable communication over an unsecured environment as Internet is.
1. Enabling or checking that Gmail allows POP3 and IMAP connections
For this, you have to get into mailbox Settings area by clicking on top right link called Settings, then go on "Forwarding and POP/IMAP" tab, like in below picture ( click on it to enlarge ). Then be sure to check the following radio buttons: from POP area - "Enable POP for all mail" and ( if you need an additional way to access your mail ) from IMAP area: "Enable IMAP".

They also put at your disposition a comprehensive help for setting your mail connection in the links below each category.
2. Installation
The order of installation is very important: GnuPG, Thunderbird and EnigMail. Start by downloading Thunderbird, EnigMail (it has xpi extension since it's a plugin ) and GnuPG (in the windows binaries section on webpage ) from their websites. The plugin interfaces the GNUPG and Thunderbird making available signing and encrypting messages in one step in sending mail process.
GnuPG - straight forward so I will not discuss it here.
Mozilla Thunderbird - straight forward so I will not discuss it here.
EnigMail - you have to download and save the .xpi file. Then open Thunderbird and choose Tools->Add-ons and then click on 'Install' and navigate to wherever you saved the EnigMail extension. Click on the Install Now button. The extension should be loaded and you should see next figure:

Restart Thunderbird in order to load the new installed addon.
3. Configuration
3.1 GnuPG - Creating keys
Open a command line and navigate to GnuPG directory.
- In order to generate keys, please type gpg --gen-key into the command window.
- If you run it for the first time, the program will create 2 keys ( secret and public ) and then offer you a list of options to create your pair of keys. Select first option (1 - default option ) which will enable you to create a key using DSA and Elgamal algorithms.
- Then you can choose the length of your key. As bigger you choose it, the harder will be to be cracked. Usually, 2048 bit is enough secure for most people, but if you want extra security, go for 4096 bit encryption. For your information, brute force attempts to crack the code takes 2^2048 processor cycles and our universe time is round 2^512.
- On the next step choose how long the key should be valid for. You can choose to have no expiry date, setting 0, or choose "2y" which will set an expiry date of two years. Once you've inserted a value different than 0 and pressed enter, the expiry date will be calculated and shown to you. Type y and press return.
- Now is the most important part of generating the key pair : your data which will link you to the certificate as humans can perceive it.
- First you're asked to insert your name. Usually you insert "FirstName LastName", but if you have several first or last names you can enter them all.
- Now enter the mail address that you'll use for sending encrypted or signed mails. Usually, the receiver will query the key websites for your mail in order to get the key for decrypting your mail.
- Third step asks you about an optional comment like in my case "Media Informatics 2008" ( because at that point I thought to use only for school, but now I'm considering signing my mail with it always)
- On enter, you'll be asked to confirm and this is the last opportunity to modify some wrong data. Then press 'O' if everything is ok ( O stands for OK)
- Now you have to insert your password - this will be used later for encrypting your mails, so be ABSOLUTELY sure what you write there or you won't be able to use this keys to secure your emails. Don't be frightened if nothing appears ( like * in Windows password boxes ) in your prompt. The text is there. Then you'll have to confirm the password.
- As you entered and confirmed your password, the key generation will start, and you'll see some +, . and other characters to show you that something is calculated in background (kind of process bar - proving that the system isn't blocked or something else), like in the picture below. Beware that it will take some time, depending your computer processing power. meanwhile, you're advice not to use the keyboard, mice. The reason ( in non technical terms ) is that by not using the resources, the system random numbers generator works better - so the security is increased.

- Once the key is completely generated you can do several operations with your key - list, export, etc. In order to use your key for signing mails, the recipient must have a way to recognize your signature. To accomplish this, you have to export the public part of your key and later upload it on a key website.
- In the same command window, please type gpg --list-keys in order to list all your keys available on the system.
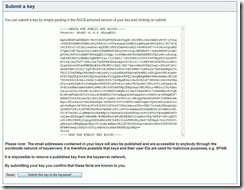
- To export one, type gpg --export -a -output filename.asc where filename.asc is the filename in which the ASCII content of the key to be put.
- To make your public key usable, you can use several servers whom main ability is to store them and make them available freely on the Internet, upon request. To do so, you'll have to visit one of them ( since they at some point are interconnected, there is no point in putting your certificate on all key websites ) - I choose http://wwwkeys.de.pgp.net/ and there, on the first page, you can submit a key by pasting your entire public key ( all the lines from the filename.asc as created at 7.2 ) in the corresponding box and click submit, like in picture below:
3.2 Setting Thunderbird
I assume that you didn't used yet Thunderbird, as I was never before. I is a nice program which I heard of for several years, but since on office I always used Microsoft Outlook and at home Gmail web interface, I didn't had yet the chance of playing with this tool. I have the strongest believe that it is in same line as his brother Firefox Browser brother - slick, easy to use and fast.
Upon first start, you'll be invited to setup your own mail. The setup is very easy - in the normal line of these products. Click the 'Create new account' link as in the picture below

First you choose Gmail account:

Then insert your real name, as it will appear to your correspondents. Also here you have to set the email - the one for which you already created the keys.

Then you'll see the finish window:

The mail account setup is finished !
3.3 Incorporating the security into Thunderbird
Next and final step is to setup Thunderbird to allow signing and encrypting the emails.
To do so, you have to open Thunderbird and having selected the already spoken about account, go to Account Settings for your identity and click on OpenPGP Security.
In order to activate the use of encryption and signing, you have to tick the Enable OpenPGP support (EnigMail) for this identity and the Use email address of this identity to identify OpenPGP key.
Some mentions :
- - You can select 'Use the email address of this identity to identify OpenPGP key' option if your email address is the same as the email address used when create the authentication key, otherwise select like in the image 'Use specific OpenPGP keyID ( shown only as example, I use the first option ) - they are the same if email address is the same as the email address used when create the authentication key;
- - For easy of use , I checked the 'Sign non encrypted messages by default' and 'Sign encrypted messages by default' ;

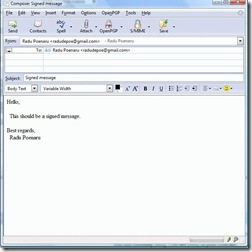
3.4 Testing - signing
I compose a message, with defaults as above, I checked the 'Sign non encrypted messages by default' and 'Sign encrypted messages by default' ;
If you try to send the message and you mark it for signing or for encrypting and you don't have yet the recipient's public key in your collection, you'll be prompted to select one of already added ones or to get it from a key server. The key can be received searching by recipient name or his email. There can be cases in which more than one key is returned, either because user have more than one certificate for a email or different ones for different mails. Then you have to choose manually one or more of them to be added to keyring ( local store of keys).
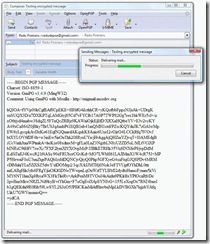
Then on sending notice that the content is updated, because:
- Thunderbird sent to EnigMail the content of mail and requested a sending
- Enigmail passed the content to GnuPG for signing
- Signed message was returned from GnuPG to EnigMail and replaced the content of mail in Thunderbird:

Proof (the popup raises when you click on the red dotted envelope on header area - looks like a medieval seal, by the way ) :

And as it will be seen in a web interface with no GPG installed:

3.5 Test - encrypting mails
Composing a message - notice that when changing the security options in PGP menu the corresponding status bar icons are changing:

Sending the message - the content is updated by GnuPG
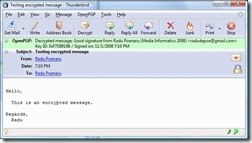
When seeing the e-mail on the recipient side ( the email is encoded with the recipient's key ) he has to input his password in order to decrypt the content

After inputting the correct password, the content is available to the recipient
The proof : encoding in a medium that doesn't know about decoding:

4. Signing certificates
This part represents the extension of certificates trust among people who know eachother. So if I trust Alice and Bob and them are trusted by Charlie, Charlie can trust me also based on his opinion on Alice on Bob.
First you have to find out the KeyId for which you want to sign the certificate. This can be done in several ways:
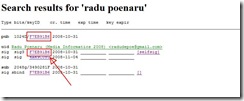
- Use the http://wwwkeys.de.pgp.net/ website and search by a particular user . The image below is the result of searching the website by my name and has my KeyId in a red box:
- You can find it in Thunderbird by opening in main menu OpenPGP > Key management and look in the KeyId cell of the corresponding user whom signature you want to sign

- Third option is to open a command prompt and navigate to gpg directory then type gpg --list-keys

Second, you have to use the gpg command prompt by navigating to gpg directory . Then you have to type gpg --sign-key KeyId (replace the KeyId with previously found string ) which will sign ( apply the trusting and your signature ) over the selected key. The next and final step is to submit the key to the keyserver in order to notify all interested your trusting level by using gpg --keyserver wwwkeys.de.pgp.net --send-key KeyId (replace the KeyId with previously found string ).
Thank you for spending time and reading this tutorial.
Any comments and completions are welcomed.


